Exploring Time Capsule: Time Machine over the Network vs USB
Time Capsule is billed as an ideal backup target for Time Machine. At the same time, networked drives (and particularly wireless shares) are often slower than a directly connected USB backup drive. This segment, the fifth of six exploring Time Capsule in depth, compares the pros and cons of using a solution like Time Capsule and the AirPort Extreme to perform Time Machine backups relative to using a directly attached hard drive.
Even at top speed and positioned in a rarified spectrum of bandwidth, 802.11n can't hold a candle to the throughput of a directly connected USB hard drive. Of course, connecting a USB hard drive to perform Time Machine backups is also not a brilliantly convenient setup. Additionally, Time Capsule supports Time Machine backups from multiple Macs; to do the same thing using a directly connected USB drive, you'd have to unplug the drive at regular intervals and attach it to each machine needing to be backed up.
Time Machine also deals with directly connected UBS hard drives (or Firewire or SATA drives) and network shares on Time Capsule or AirPort Extreme drives differently, making the two methods incompatible. Users have to decide between using Time Machine over the network or to a local disk; the same USB drive can't be shuttled between the two to create a single set of backups.
When using a directly connected drive, Time Machine saves its backup files in a hierarchy of folders by date. Part of the magic of Time Machine comes from the use of hard linked files, where a single data file on disk can be linked to multiple file records appearing in different folders. This enables the system to keep a full set of files for each backup session without actually duplicating the contents of the files that haven't changed. This also allows Time Machine to delete folders of backed up files that are no longer needed without coping any of the files around, yet maintain a full set of backups. Hard links were described in greater detail in the article Road to Mac OS X Leopard: Time Machine.
Apple added support for hard links to the Mac's native HFS+ file system to support Time Machine. Some file systems don't support hard links, so in order to consistently handle Time Machine backups on network shared file systems, Time Machine uses a different method of saving its files: it creates a sparse file disk image that appears to the native file system to be a standard file, but which Time Machine can internally organize as a virtual HFS+ disk with support for hard links. Inside this disk image, the hierarchy of hard linked files looks the same as that of a directly connected Time Machine disk.
There isn't a way to tell Time Machine to target a sparse file disk image of your own making however, so you can't use this method with a directly connected drive. Subsequently, the file layout between network connected drives and directly connected disks used by Time Machine are not compatible or interchangeable. That means you can't plug in a drive directly and begin a Time Machine backup, and then append further backup updates onto it after plugging the drive into a Time Capsule or AirPort Extreme as a network shared disk; Time Machine will simply copy all the files over again in parallel.
The best alternative short of that is to plug the base station into the host computer directly via Ethernet, and allow Time Machine to backup to the disk the fastest way possible for its first session. After it's complete, the base station can be unplugged and subsequent backups will occur wirelessly. This method can also be used anytime you've performed major changes and have a lot to back up, or whenever you want to accelerate your Time Machine backup session. As the numbers below indicate, its about two to four times faster to copy files over Ethernet compared to 802.11n.
USB vs Network File Sharing Shootout
For an idea of how much faster direct Gigabit Ethernet is to WiFi N or to a directly attached USB drive, we performed some tests again, twice, to see how much difference there would be between the tests. Note that wireless times tended to fluctuate wildly, while times for USB or Ethernet were far more consistent.
- Directly attached to a MPB, our USB drive took 0:49 to copy the gigabyte of files.
- The same drive, attached to Time Capsule via USB, took between 4:21 and 7:22 to copy via 802.11n using 5 GHz with wide channels.
- Using the internal drive inside Time Capsule, it took between 5:45 and 6:30 to copy via 802.11n using 5 GHz with wide channels.
- The external drive, attached to Time Capsule via USB, took between 2:19 and 2:20 to copy via Gigabit Ethernet.
- The internal Time Capsule disk took between 1:39 and 1:40 to copy via Gigabit Ethernet.
- The external drive, attached to a PowerMac G5 via USB, took between 0:38 and 0:43 to copy via Gigabit Ethernet, slightly faster than when it was used as a directly connected USB drive.
Clearly, wireless networking involves some mystically complex principles that result in a wide margin of performance variance: even with identical settings, files can take anywhere between 2:15 and 8:00 per gigabyte to copy. Still, WiFi also offers a level of convenience and at least fairly reasonable performance (when configured properly and in ideal conditions) that supports an increasing scope of useful applications, from AirTunes streaming to file and print sharing to Time Machine automated backups.
By tuning your WiFi network to get the most of your signal, you can expect decent performance from background backups and centralized file sharing without having to string up Ethernet cables. If you already have an Ethernet network in place, Time Capsule doesn't offer the most impressive file server performance; it's really quite disappointing for use as a Gigabit Ethernet file share host.
Remember that if you need better disk performance than Time Capsule can offer on its own, you can attach an Ethernet NAS appliance to the base station's Gigabit Ethernet LAN ports, or alternatively use Personal File Sharing on a Mac similarly connected via the Gigabit Ethernet switch. Wireless clients likely won't see any difference in their access to the file server, but wired clients will. Such an alternative is also significantly more expensive, larger, and will consume more power.
page 2 of 2: Charting Performance: USB vs 802.11n vs Gigabit Ethernet; and Gigabit NAS vs USB RAID.
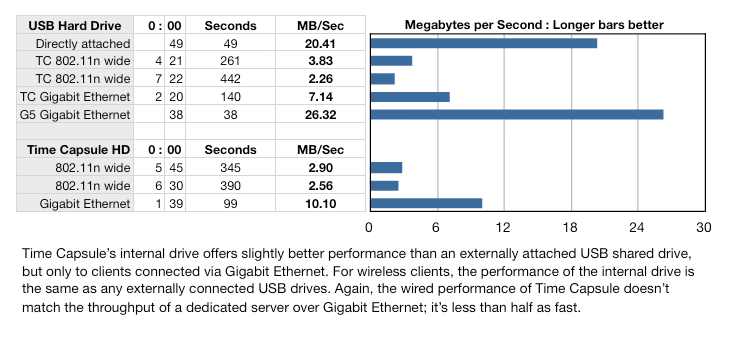
The chart below compares the copy time and megabytes per second transfer rate of the same USB hard drive when directly attached to a MacBook Pro, when connected to Time Capsule and shared as a network drive wirelessly and via Gigabit Ethernet, and when connected to a PowerMac G5 and shared over the network via Gigabit Ethernet. The second section compares the speed of copying files to the SATA drive inside Time Capsule, both wirelessly and via Gigabit Ethernet.
The fastest alternative is a dedicated server sharing files via Gigabit Ethernet. A directly connected USB drive is nearly as fast. For Time Capsule clients, the fastest option for connecting to its shared drive is via Gigabit Ethernet; that network connection is fast enough to actually expose a speed advantage of the internal SATA drive over an external USB disk, although its still only about half as fast as a dedicated server.
For wireless clients, a USB drive attached to Time Capsule is really no better nor worse than the internal SATA drive. There is little or no advantage for wireless clients in using a NAS or standalone server over the built in disk sharing of Time Capsule or the AirPort Extreme, until multiple concurrent users begin hammering the drive. That positions Time Capsule as a good solution for casual home users who want to go wireless and small office users with simple needs.
Gigabit NAS vs USB RAID
As with the AirPort Extreme, additional drives plugged into Time Capsule via USB are also shared by the base station, and appear in the Finder of client computers as sharepoints associated with the Time Capsule device. They also become available to Time Machine as backup targets. That means larger USB drives or a standalone USB RAID device can be used to expand the capacity of the base station beyond the internal drive in Time Capsule.
However, the limitations of the base station's embedded hardware in serving up file shares means that users who want to expand Time Capsule beyond its internal disk should profile their needs. It may make more sense to instead attach a self contained NAS appliance to the Time Capsule's integrated Gigabit Ethernet switch. That will delegate the file serving effort to the external NAS box itself, leaving the Time Capsule available to serve as a backup file share.
The concluding sixth segment will wrap up the discussion of the overall performance and features of Time Capsule and review its pros and cons for different types of users who may be considering a purchase or upgrade.
Previous articles related to Time Capsule and its AirPort Extreme cousin:
 Prince McLean




 Andrew Orr
 Sponsored Content
 Malcolm Owen

 William Gallagher
 Mike Wuerthele
 Christine McKee